3.1. File Menu
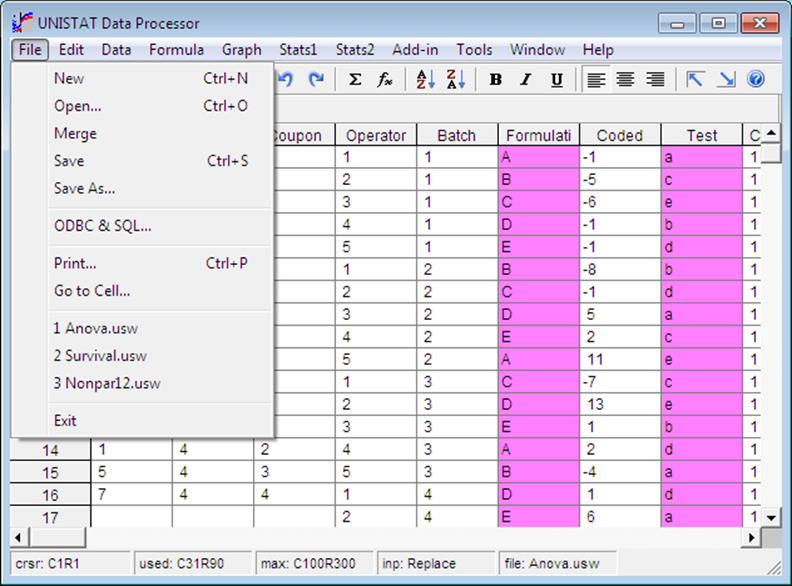
The first option on the menu bar File provides access to file and printing operations.
3.1.0. File Formats
Whenever one of Open, Merge or Save As is selected from File, a standard Windows file dialogue will pop up to open or save files in popular PC file formats.
While exporting or importing data, it is possible to include or exclude Column Labels and Row Labels as part of the file. The following two check boxes provided in Open and Save As dialogues, as well as in the Tools → Options → Data Export / Import 2 dialogue (see 2.4.1.6.2. Labels), should be set correctly:
|
Column labels in row 1 |
|
Row labels in column 1 |
When importing a file, it is essential to know whether the data in row 1 and column 1 of such files contain Column Labels and Row Labels respectively. This information should be consistent with the current settings of the above check boxes. Otherwise the result may be a Device or File Error message and the data may not be read in correctly.
WARNING! When importing files, you should ensure that current settings of label options are consistent with the actual file. Otherwise the file may not be read correctly (see 2.4.1.6.2. Labels).
UNISTAT can recognise the missing values in files imported from other scientific applications (see 2.4.1.1.4. Missing Data Code).
When importing files, UNISTAT will distinguish between numbers and alphanumeric information. A data point in file can be one of the following:
1) Number (in the range of ”“E300 to +E300)
2) Column label (unlimited number of characters)
3) Row label (unlimited number of characters)
4) String variable (unlimited number of characters)
5) Date variable (format as in Windows international settings)
6) Time variable (format as in Windows international settings)
7) Missing Data Code (as in Tools → Options → Memory Management)
8) No Data Code (as in Tools → Options → Memory Management)
Being a column-based spreadsheet, UNISTAT’s Data Processor expects a variable to contain one of numeric, string, date or time formats, but not a mixture of them. Different data types cannot be mixed within a single column.
If the missing and no data codes in the incoming file are not consistent with the corresponding values in UNISTAT, you can change UNISTAT’s codes in Tools → Options → Memory Management dialogue first (see 2.4.1.1.4. Missing Data Code and 2.4.1.1.3. No Data Code).
Parentheses ( and ) within labels will be filtered out by the program during text file loading or merging. Also, the leading and trailing spaces are trimmed from labels and string variables.
3.1.0.1. UNISTAT Internal Files
UNISTAT Internal (.USW) files store almost all information the Data Processor contains. This includes all numeric, short and long String Data, missing observations, Column Labels and Row Labels, formulas, formatting information such as column widths, fonts, style, colour, size and justification. UNISTAT internal files are in binary form and thus their contents are not visible in a text editor. However, compared with any other file format supported here (including Excel files), UNISTAT internal files occupy much less disk space and they can be saved, loaded and read more quickly. The user is strongly recommended to use the internal UNISTAT (.USW) file format for routine data storing / retrieving operations.
When loading or merging a UNISTAT internal file, the program will first compare the number of columns and rows in the file with the dimensions of the data matrix. If the dimensions of the file are too large for the present matrix, the program will display the minimum number of columns and rows required for this data file. In this case, select Tools → Options → Memory Management, set the spreadsheet dimensions to more than that required by the data file and try loading it again.
When saving a UNISTAT internal file it is possible to select a subsample of rows to be saved in file rather than saving all rows in the Data Processor. A check box is provided in Tools → Options → Data Export / Import 1 → Options dialogue to enable this option.
3.1.0.2. Excel Files
UNISTAT can read Excel files, retrieving all numeric, string, date and time data, cell formats, and values of formula cells, but not the formulas themselves. Files can be saved in Excel 97 ”“ 2003 (.XLS) and 2007-2010 (.XLSX, .XLSM, .XLSB) formats.
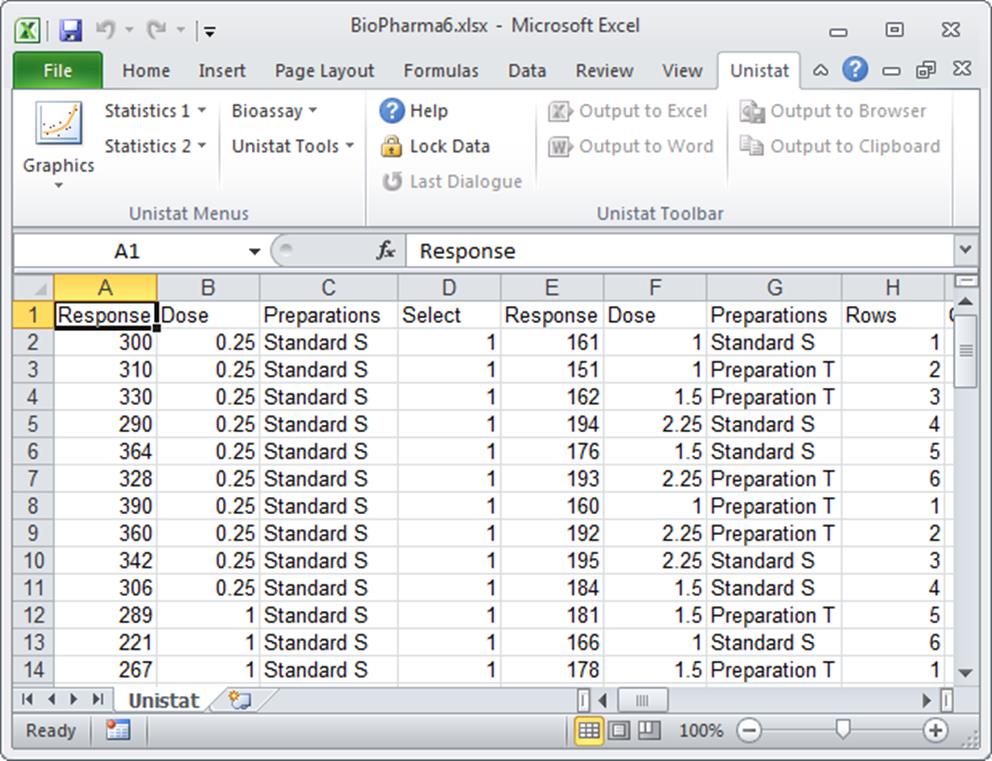
As workbook files may contain more than one worksheet, when loading such a file UNISTAT will list the worksheets in the file and allow loading one worksheet at a time. If the workbook contains multiple worksheets, and you wish to load more than one, then you may select the File → Merge option to place the Excel worksheets into different parts of the Data Processor.
WARNING! When importing files, you should ensure that current settings of label options are consistent with the actual file. Otherwise the file may not be read correctly (see 2.4.1.6.2. Labels).
String and numeric data should not be mixed in columns, with the exception of Column Labels in row 1. Please read the beginning of this section File Formats and sections 2.4.1.5. Data Export / Import 1 and 2.4.1.6. Data Export / Import 2 for the rules regarding reading and writing Excel Files.
If the file to be imported contains string variables, they will be read according to the settings in Tools → Options → Data Export / Import 1 → String Import Options.
Blank cells within data and cells containing an asterisk (*) character will be read as missing data. If the incoming file has a numeric Missing Data Code, you can change UNISTAT’s internal missing data code to recognise the missing values in the file (see 2.4.1.1.4. Missing Data Code).
3.1.0.3. Lotus 1-2-3 Files
UNISTAT can write the entire contents of the Data Processor into a .WK1 file, including Column Labels and Row Labels, numeric and String Data and cell formats, but excluding formulas. It can also load or merge .WK1, .WKS and .WK3 (Release 3) files, retrieving all numeric and String Data, cell formats, and values of formula cells, but will not load formulas themselves.
As Release 3 files may contain more than one worksheet, when loading such a file UNISTAT will prompt for the number of the worksheet. Enter the number of worksheet you wish to load. If the Release 3 file contains only one worksheet, then its number will be 1. If the file contains multiple worksheets and you wish to load more than one, you are recommended to use the File → Merge option to place worksheets into different parts of the Data Processor.
Other aspects of reading and writing Lotus files are the same as in Excel Files.
3.1.0.4. Delimited Text Files
Delimited text files (also known as CSV files) are commonly used for exporting and importing data to and from database and spreadsheet applications. In English language Windows systems data values are separated by a comma (the field delimiter) and String Data are enclosed within double quotation marks if they contain a comma. In non-English Windows systems the semi-colon character ‘;’ may be used as a field delimiter.

UNISTAT employs a simple rule in deciding which character is to be used as a delimiter in CSV files. If the decimal numbers use the dot character as the floating point, then comma is used as the CSV field delimiter. Otherwise, the semicolon character is used. You can override this automatic choice by entering the following line in Documents\Unistat10\Unistat10.ini file under the [Options] group:
CSVdelimiter=x
where x can be any character to be used as the field delimiter.
If the file to be imported contains string variables, they will be read according to the settings in Tools → Options → Data Export / Import 1 → String Import Options.
Another characteristic of the CSV files is that one row in the file is read as one row of the spreadsheet. In other words, the carriage return is used as a row delimiter. UNISTAT supports other text file formats where this limitation is not present (see 3.1.0.5.1. Free Format Text Open).
3.1.0.5. Free Format Text Files
As users of scientific applications know well, the delimited text format is not sufficiently powerful to read and write all kinds of text files.
In UNISTAT, we classify free format text files further according to the sequence of data written into them. Here we make a distinction between files written by row (i.e. the first rows of all columns first and then the second rows of all columns etc.) and by column (i.e. all rows in the first column first and then all rows in the second column, etc.). These two ways of sequencing the data are also referred to as by observation and by variable. The by row format can sometimes be referred to as the matrix format.
The user can select tab, comma, semicolon or any other character as a field delimiter from Tools → Options → Data Export / Import 2 → Text Field Delimiters dialogue. However, as distinct from the CSV format, the end of line character (carriage return) does not mean the end of a row of data. This will be explained in more detail in the following sections.
UNISTAT can load and save Column Labels and Row Labels as part of text files, both in by row and by column formats. Whether Column Labels or Row Labels will be read or saved as part of text files is controlled from Tools → Options → Data Export / Import 2 → Labels.
UNISTAT assumes that a free format file will have a .TXT extension. However, this can be changed to any other extension during loading or saving (see 3.1.2. Open).
If the file to be imported contains string variables, they will be read according to the settings in Tools → Options → Data Export / Import 1 → String Import Options.
3.1.0.5.1. Free Format Text Open
By Row: If the file is being loaded by row, the number of columns must be specified by the user so that the program will know when to finish reading the first row and continue with the second. This is a superior method than used by the CSV format, which can only read one line of the file as one row of the data matrix. When the rows of the incoming file are sufficiently long, they may take several lines each in the text file. In this case, users of packages which support the CSV format only are faced with the extremely unpleasant task of moving rows to their correct positions in the spreadsheet.

If the Column Labels in Row 1 box is checked in Tools → Options → Data Export / Import 2 → Labels dialogue, the program will read the first n entries (i.e. the number of columns as specified by the user) as Column Labels. This is irrespective of whether these entries are enclosed within text qualifiers or not.
If the Row labels in column 1 box is checked (see 2.4.1.6.2. Labels), the program will read the next entry as the first row label. Again, this is irrespective of whether this entry is enclosed within text qualifiers or not.
WARNING! When importing files, you should ensure that current settings of label options are consistent with the actual file. Otherwise the file may not be read correctly (see 2.4.1.6.2. Labels).
The program then goes on reading the next n entries as the first row of data. UNISTAT will work out the type of data in row 1 (or row 2, if the first row contains Column Labels) and it will assume that the rest of the rows will conform to this. If a column starts with missing values, then UNISTAT will determine the type of such columns from their first non-missing value.
IMPORTANT! When importing files, UNISTAT determines the type of column (i.e. numeric, string, date or time) from the first row of data in the file.
Special attention must be paid to text files which are to be read by row, and where the field delimiter is Space(s). While UNISTAT can recognise a blank cell as a missing cell with any other field delimiter, it is impossible to distinguish a blank cell when the field delimiter is Space(s). Also, for the same reason, in such files all columns must have an equal number of observations. If the file contains columns with unequal lengths, then the data will not be read into the correct cells after the shortest column is fully read into the data matrix. In order to prevent this happening, shorter columns should be padded either with the No Data Code or the Missing Data Code.
By Column: When the by column option is selected, data is read into a column cell by cell. Variables are assumed to be separated by a pair of double quotes. If the Column Labels in Row 1 box is checked in Tools → Options → Data Export / Import 2 → Labels dialogue, the program will read the String Data enclosed within the specified text qualifiers as Column Labels.
It is not possible for the Data Processor to read by column text files containing string variables, that is, String Data apart from Column Labels and Row Labels.

If the Row labels in column 1 box is checked (see 2.4.1.6.2. Labels), the program will read all alphanumeric data at the beginning of the file as Row Labels first, as if the Row Labels were the column zero of the data matrix. When a numeric input is found then the program will put the last label read into the first column and start reading numbers. When a double quote is encountered the program will assume that the current column is read completely and put the contents of the string into the label of the next column. The subsequent numeric information is placed into the new column until another double quote is found.
3.1.0.5.2. Free Format Text Save As
The maximum width of lines in a text file saved by UNISTAT is determined by the Width parameter defined in Tools → Options → Output → Text Margins. That is, if the output width is set to 80, then the width of the file will also be 80 characters. The maximum allowed width is 32,000 characters per line.
In order to obtain the desired Number Format in the text file, Data → Format Columns option can be used before selecting File → Save.
In numeric data columns, cells containing missing or no data will be represented by their numeric values, i.e. the codes as displayed in Tools → Options → Memory Management dialogue. For string, date or time data columns, the missing and no data cells will be saved as blank, i.e. “”.
By Row: If the data is to be saved by row, and column lengths are not equal, all shorter columns will be added a sufficient number of No Data Codes to complete the matrix elements.
By Column: A file saved in column format can be read directly back into the Data Processor, as long as it does not contain string variables.
If the Column Labels in Row 1 box is checked in Tools → Options → Data Export / Import 2 → Labels dialogue, then all Row Labels will be written before any numeric data. Each column will start with its column label followed by all data in that column. In case the length of a column is less than the maximum then no data markers will not be written to the end of the column.
3.1.0.6. Fixed Format Text Files
Fixed format text files are similar to free format text files saved by row, in that they follow the same sequence, i.e., the first rows of all columns, then the second rows of all columns, etc. However, they are different in that data points need not necessarily be separated by special characters (delimiters). Each column (variable) is allocated a fixed number of characters and thus the characters which belong to a certain column can always be distinguished according to their position in the file. Fixed format text files are also known as non-delimited text files and they can be more compact than free format text files.
UNISTAT assumes that a fixed format file will have a .SDF extension. However, this can be changed to any other extension during loading or saving.
Each line in a fixed format text file is called a record. If there are too many variables to fit in a single line then data belonging to the same row can be continued in the subsequent lines. For example, a file which contains 10 rows of data each of which is in three records will have 30 lines.
3.1.0.6.1. Fixed Format Text Open
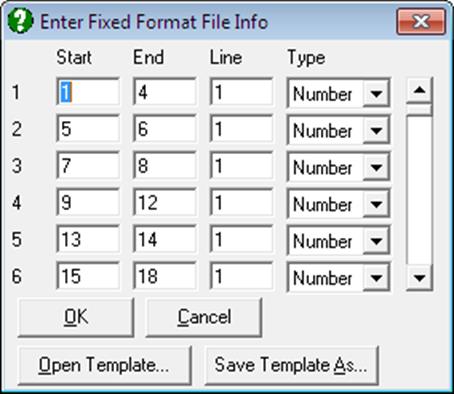
After selecting this format, a window for entering and / or editing the column positions will be opened on the upper half of the screen. The view file window on the lower part will remain open. At any stage, you can click on the View File window to see the contents of the file.
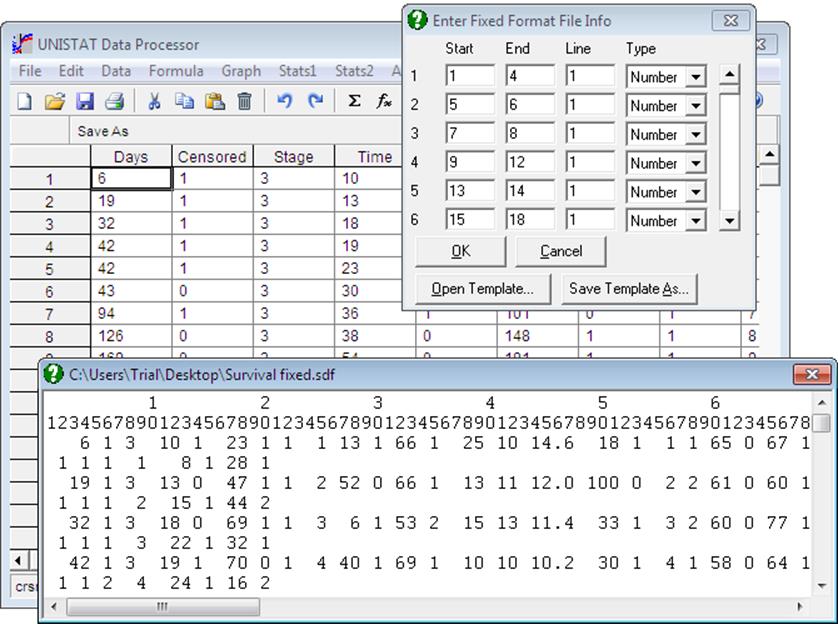
The first column in the upper window indicates the column number of the variable. The subsequent three columns are numeric input fields for the start and end column positions of the variable and its record number respectively. The last field indicates the type of the column and it can be one of Label, Number, String, Date or Time.
When loading a fixed format file which was previously saved by UNISTAT, the program will first look for a fixed format template file, that is, a file containing the information needed to load a fixed format file. Whenever a fixed format file is saved from UNISTAT, a template file is created containing column positions, types and labels of all columns in the main file. Fixed format template files have the same name, but a .SIF extension. If UNISTAT can find an accompanying .SIF file during loading an .SDF file, it will get the necessary information from this file and fill in the input fields of the upper window automatically. The default values may be either accepted or edited. If there is a corresponding template file with a different name or extension, then you can browse and open any template files by clicking on [Open Template].

If a fixed format text file is loaded which was saved from a different application, then there will not be an accompanying template (.SIF) file and, on entry, the fields of the upper window will be empty. You can fill in all the required fields, if necessary switching between the lower and upper windows. Unlike saving a fixed format file, however, the last column in the upper window Type is vitally important here, since it will instruct the program to read data columns as Row Labels, string, numeric, date or time data.
Once the field specifications are entered, you can save this information in a fixed format template (.SIF) file clicking on the [Save Template As] button. Saving a fixed format file will also create an accompanying template file automatically.
It is always possible to create a .SIF file for any fixed format files prior to entering UNISTAT, using a text editor. The best way to do this is to edit an already existing UNISTAT fixed format template (.SIF) file, as the column and row positions of all information in .SIF files are absolutely crucial. If you prefer to fill in the upper window fields interactively, it will be a good idea to save this information in a template file. Alternatively, you can also save the same file immediately after reading it (better with a different name), in order to create a template (.SIF) file for it automatically.
3.1.0.6.2. Fixed Format Text Save As
Saving a fixed format text file is similar to loading one. Again, a window for entering and / or editing the column positions will be opened on the upper half of the screen, and a window will be opened on the lower half displaying contents of the file to be saved. At any stage, you can click on the view file window and view its contents.
The maximum width of lines in a text file saved by UNISTAT is determined by the Width parameter defined in Tools → Options → Output → Text Margins. That is, if the output width is set to 80, then the width of the file will also be 80 characters. The maximum allowed width is 32,000 characters per line.
UNISTAT will first format the data to be saved in fixed format, i.e., either the whole matrix or the highlighted block of cells. It will determine the minimum width of each column in which all data could be presented without a loss of significant digits, and open two windows, one for giving you the opportunity to change column positions interactively and the other to preview the appearance of the file to be saved.
Row Labels will be saved as a part of the file, only if the Column Labels in Row 1 box is checked in Tools → Options → Data Export / Import 2 → Labels dialogue. Column Labels are not saved as part of .SDF files. They will, however, be saved in the accompanying template (.SIF) file (see 3.1.0.6.1. Fixed Format Text Open).
The first column in the upper window indicates the column number of the variable. The next three columns are numeric input fields for the start and end column positions and the record number of the variable respectively. The last column is a drop-down list and indicates the type of the column. It can take one of the following five values: Label, Number, String, Date or Time. To save the file as formatted by the Data Processor just press <Enter/OK>.
The numeric fields in the upper window can be edited to achieve a fixed file format of choice. The field Type, however, is there only for information, and changing it will not make any impact on the format of the file. This information is predetermined by the nature of the data in the Data Processor.
When a fixed format text file is saved, the Data Processor will save the file with a .SDF extension, if one was not supplied. However, the Data Processor will also create a second (template) file with the same name but with a .SIF extension, which contains information on the position, the record number and the label of each variable; in effect, a record of the upper window. The fixed format template (.SIF) files are not only useful for reference, to keep track of which variable is where in the file, but they are also used by the Data Processor to load back a fixed format text file without any need to type the column and record information once again.
3.1.0.7. Data Interchange Format (.DIF) and Symbolic Link Format (.SLK) Sylk Files
These two file types are similar in that they store information in text format (text files) and store individual data points in separate lines. These are usually long, narrow files which can be, in theory, edited by the user. .DIF and .SLK files will save or load almost all information in the Data Processor, including all Column Labels and Row Labels, numeric and String Data and column formats, but excluding formulas.
WARNING! When importing files, you should ensure that current settings of label options are consistent with the actual file. Otherwise the file may not be read correctly (see 2.4.1.6.2. Labels).
If the file to be imported contains string variables, they will be read according to the settings in Tools → Options → Data Export / Import 1 → String Import Options.
3.1.0.8. Database Files
UNISTAT’s File → Open and File → Save As dialogues support the Access 97, 2000-2003 (.MDB), 2007-2010 (.ACCDB) and dBase (.DBF) database formats directly. It is possible to open, merge and save files directly in these database formats.
It is also possible to open any database files which are not directly supported by UNISTAT, but for which ODBC drivers are installed in the Windows system. The File → ODBC and SQL option will list all available ODBC drivers in your system.
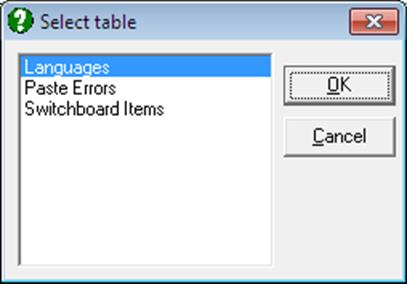
If the database contains more than one table, a dialogue will pop up asking for the table to be imported. The list of tables normally excludes the hidden ones. If you wish to have all tables displayed, enter and edit the following line in Documents\Unistat10\Unistat10.ini file under the [Options] group:
ODBCAllTables=1
By default, UNISTAT will attempt to read the entire table opened from the File → Open or File → Merge dialogues, i.e. it will try to read all fields and all cases in the table. If the database is too large, then UNISTAT will read only those fields and cases which can fit into the current dimensions of the Data Processor (see 2.4.1.1. Memory Management). Should it be necessary to extract a subset of fields or cases from a large table then it is possible to click on the [SQL] button (see 3.1.6. ODBC and SQL) to execute SQL statements.
Older dBase files support a limited number of fields (columns) and they do not recognise exponential numbers. When saving data into dBase files, all exponential numbers will be truncated. Missing and no data cells are saved as -999.
When loading a database table, the field names will only be imported if the Row labels in column 1 box is checked in Tools → Options → Data Export / Import 2.
If the file to be imported contains string variables, they will be read according to the settings in Tools → Options → Data Export / Import 1 → String Import Options.
When creating a database file, by default the field width for Row Labels and long string variables is set to 20. To increase this limit enter and edit the following line in Unistat10.ini file under the [Options] group:
DBLabelWidth=20
3.1.1. New
In order to clear all data in the Data Processor, all data as well as Column Labels and Row Labels, formulas, etc. select this option.
If the data present in Data Processor was not saved, the program will offer the option to save it first. If no changes were made in data since it was last saved, it will be cleared without a warning.
3.1.2. Open
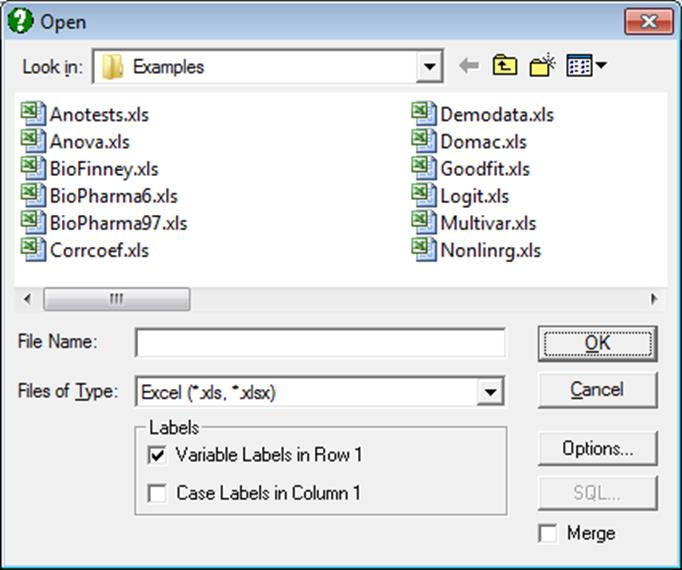
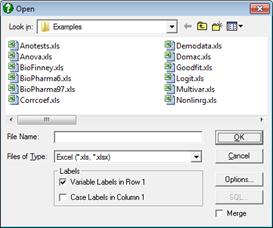
UNISTAT’s file open dialogue is similar to the standard Windows Open dialogue. The Files of Type drop-down list at the bottom left is used to list the supported file formats with their standard extensions.
1) UNISTAT (.USW)
2) Excel
3) Lotus
4) Text Delimited
5) Text Free
6) Text Fixed
7) Sylk
8) DIF
9) Access
10) dBase
11) FoxPro
12) Paradox
13) HTML
When this dialogue is opened, it will display UNISTAT internal files by default. By entering and editing the following line in Unistat10.ini file under the [Options] group, you can change the default file format displayed:
DefaultFileFormat=1
where the file format numbers are as in the above list.
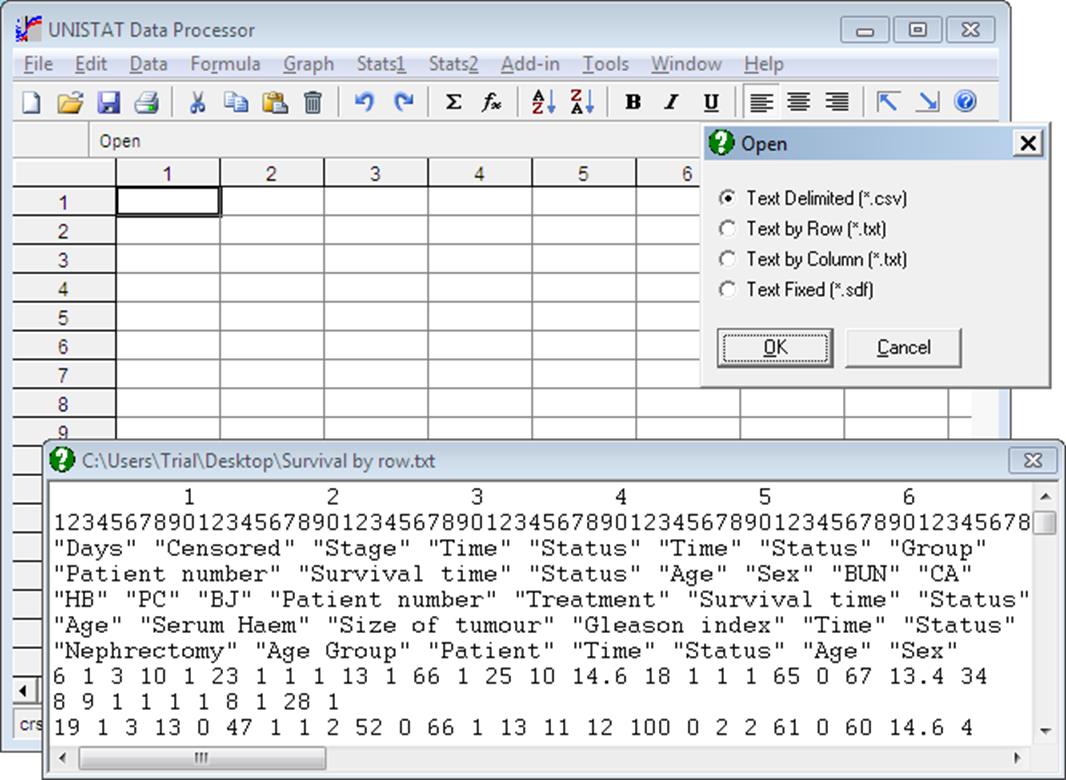
When a file is opened, UNISTAT first checks the first few bytes of the file to determine its format. Therefore, if you are not sure about the format of a data file, you can select the All Files (*.*) option on top of the list and in most cases UNISTAT will be able to read the file without any problems. If UNISTAT cannot determine the format of the file from its few bytes, or the file is in text format, then the contents of the file is displayed in a window for inspection. Another window pops up simultaneously allowing selection of one of the four text file formats, i.e. delimited, by row, by column or fixed (see 3.1.0. File Formats).
If there is already data in the spreadsheet (i.e. if the used display on the Status Panel is not 0, 0) then a prompt will ask whether to clear the existing data first.
WARNING! Opening a file will clear all data present in the spreadsheet.
In order to keep the existing data and merge the incoming file, check the [Merge] button under the command buttons (see below). Press <Enter/OK> to proceed with loading. <Escape/Cancel> will abort the Open procedure.
WARNING! When importing files, you should ensure that current settings of label options are consistent with the actual file. Otherwise the file may not be read correctly (see 2.4.1.6.2. Labels).
Options: This command button will invoke the Data Export / Import 2 dialogue which is also available under the Tools → Options menu.
Merge: Check this box to read the incoming file without clearing existing data first. This is equivalent to selecting File → Merge from the menu.
3.1.3. Merge
A file on disk can be merged into the Data Processor without clearing the data that already exist in the worksheet. The position of data to be merged from the file is controlled by means of the position of the active cell. The top left hand corner of the data matrix in file will be placed at the active cell. Therefore, the user needs to make the desired cell active before selecting the merge option.
If there are empty cells above any column read from the file then these will be treated as missing and filled with missing data markers. In case of a clash of existing data and the new data from the file, the existing data will be overwritten.
When a file is merged, all its formulas will be converted to Data (see 3.4.2.6.1. Data Conversion Functions).
3.1.4. Save
This will save the existing file in Data Processor without asking for a file format or a new file name. The file will be saved in the last format selected. If the data were entered from keyboard, rather than file, i.e. when there is no file name assigned yet, then the Save As dialogue will be activated. For details of saving different format files see 3.1.0. File Formats.
3.1.5. Save As
A dialogue for saving files will be opened. Either select an already existing file from the list or enter a new one. The program will check whether there already exists a file with the same name. If there is one, then you will be asked to choose between going ahead with saving and replacing the contents of the old file, or cancelling the procedure.
When the Save As option is selected, the user must select one of the formats available in the Files of Type drop-down list. The default is UNISTAT internal (.USW) format. For details of saving different format files see 3.1.0. File Formats.
3.1.6. ODBC and SQL
It is possible to open any database files which are not directly supported by UNISTAT, but for which ODBC drivers are installed in the Windows system.
Like the database export / import options available in File → Open and File → Merge dialogues (see 3.1.0.8. Database Files), an SQL dialogue will be available to extract a subset of fields or cases from a large database.
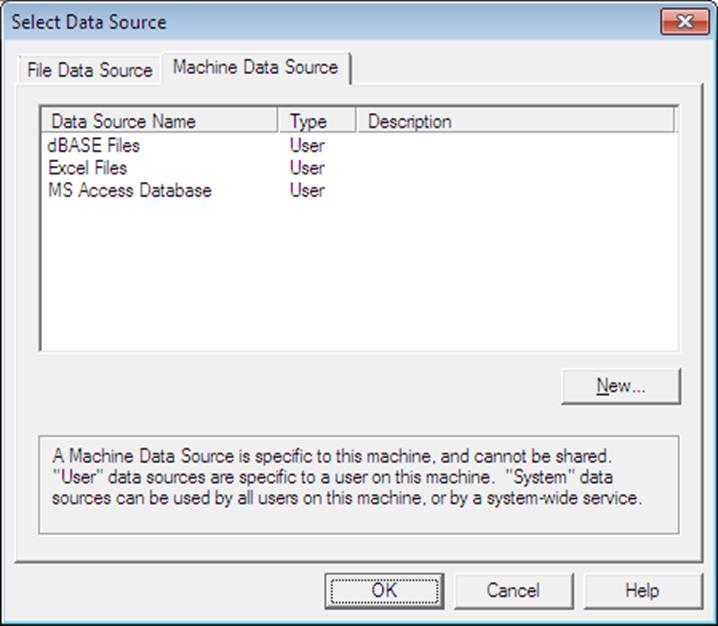
When the File → ODBC and SQL option is first selected, a dialogue will display a list of all registered ODBC drivers in your system. Upon selecting a particular entry, the program may respond in one of the following two ways:
1) If the ODBC driver selected has a binding with a particular database file, the database will be opened immediately and UNISTAT’s SQL dialogue will pop up.
2) If the ODBC driver does not have a binding with any files, then the standard file open dialogue will pop up prompting you to select a database file. If the selected file has the correct format, then it will be opened and UNISTAT’s SQL dialogue will pop up.
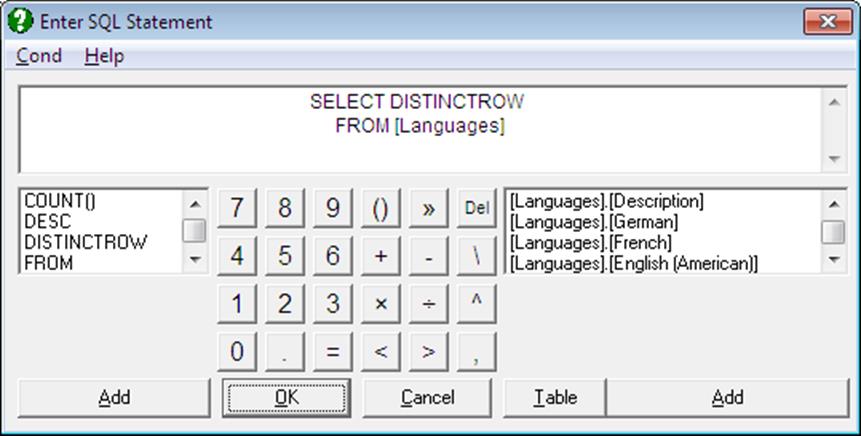
The SQL dialogue allows construction of SQL statements to select a subsample of fields and cases from a database. The dialogue consists of the following components:
SQL Input Box: The user can type any SQL statements directly into this box. If the statement has already been constructed elsewhere, it is also possible to copy it to the clipboard and then paste into this box. You should have a prior knowledge about the field names of the database to type in an SQL statement directly. If this is not the case, use the [Table] button to display the field names. See List of Field Names below.
SQL Commands List: This list on the left is provided to facilitate entering SQL commands into the text box without having to re-type them. Items selected will be pasted into the input box at the cursor position. Although only a few commonly used commands are listed, all commands supported by the particular driver can be typed in by hand.
Operation Buttons: These buttons are used to paste numbers and arithmetic operators into the input box at the current cursor position.
List of Field Names: This list will be empty on entry. Clicking the [Table] button, a dialogue will pop-up displaying the tables available in the database. Note that this may not work for all types of external databases.
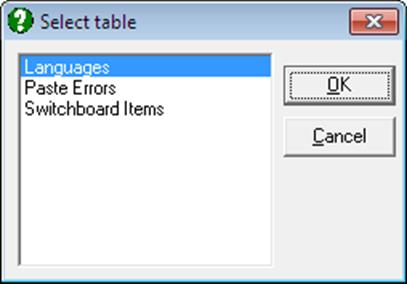
Select a table and click [OK]. The field names of the selected table will appear in the list. They will be enclosed within square brackets by the program, in order to prevent bad names causing problems. A highlighted list item can be pasted into the input box at the current cursor location by clicking the [Add] button. It is possible to open more than one table simultaneously.
Please note, once again, that it is possible to either type the SQL statement in the input box directly, or compose it by double-clicking on the desired list items. If the statement entered is valid (or compatible with the particular database you have opened) the outcome will be imported into Data Processor.
3.1.7. Print
To print the entire data matrix either switch off any highlighted block of cells, or highlight the whole spreadsheet by clicking on the top left corner. In order to print a block of cells, highlight the block first. Then select File → Print. The print dialogue will be displayed. The following options are available:
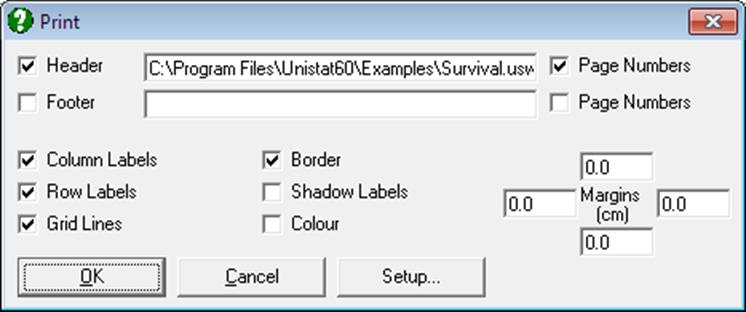
Setup Button: This provides access to the Windows Printer Setup dialogue.
Header: A line of text can be typed in. This will be displayed on top of every page. By default, UNISTAT suggests the current file name, including its path.
Footer: A line of text can be typed in. This will be displayed on the bottom margin of every page.
Page Numbers: If the box which is to the right of the header text field is checked, page numbers will be printed at the top right corner of the page. Likewise, if the box which is to the right of the footer text field is checked, page numbers will be printed at the bottom right corner of the page.
Column Labels: Check this box off not to print Column Labels.
Row Labels: Check this box off not to print Row Labels.
Grid Lines: Check this box off not to print grid lines.
Border: Check this box off not to print borderlines.
Shadow Labels: Check this box on to print Column Labels and Row Labels on a tinted background.
Colour: Check this box on to print data in colour on a colour printer.
Margins: Print margins can be set via the group of four text fields on bottom right of the Print dialogue. The values displayed are in terms of the default Windows units (i.e. cm, inches, etc.). The default margins (0, 0, 0, 0) will give a print area as defined in Windows Printer Setup dialogue. If you wish to print on a smaller area, edit these fields as necessary.
If the width of the specified data range is greater than the width of the page as specified in Windows Printer Setup dialogue, then the program will divide the range into a number of blocks so that each one fits in one page. Similarly, output will be separated into an appropriate number of rows so that there is sufficient margin left at the top and the bottom of the page.
All information displayed on the File → Print dialogue can be stored by the program so that changes made will become default automatically in subsequent sessions. The program will ask whether you wish to save the changes if any have been made. If changes are not saved, they will be effective during the current UNISTAT session only.
3.1.8. Goto
By means of this the active cell can be moved to a distant position faster than by using the arrow keys or the mouse. After selecting File → Goto type in the column number and press <Enter/OK>, and then type in the row number and press <Enter/OK>. The active cell will then be located at the specified position. If the cell is not within the bounds of the present display screen, the display will be repositioned with the required cell being placed as near as possible to the centre.
3.1.9. Auto Load
On entry, there will be no items displayed between Goto and Exit in the File menu. As you open and save data files, up to nine most recently used file names will be displayed between Goto and Exit, which are assigned short keys from 1 to 9. More recently used files will be placed higher in the list. It is possible to load a file from the list by simply pressing its short key, or by clicking on it, regardless of its format or location.
The file names in the list are stored in a text file FILELOG.TXT, which resides in the user’s private working folder. To reset the contents of Auto Load list, simply delete this file.
3.1.10. Exit
This will terminate the current UNISTAT session and close the program. If you have entered new data or edited the contents of a spreadsheet, the program will first ask whether you wish to save your data.
